DIY Abstract Art: Easy, Inexpensive Art Anyone Can Make!
- Jenny Gericke

- Jan 31, 2019
- 4 min read
Updated: Feb 5, 2019

Art can be an overwhelming and expensive choice to make when designing your home. Its difficult to find something you like and that will also work well in your space. And inevitably when you do find something you like, it probably costs an arm and a leg! But art is one of the most underutilized ways to add personality, life, and color to your home. Most people don't know what to do when selecting art so they never try and their walls sadly go bare for many years. Today, I'm going to show you how you can make an easy, personal, and inexpensive DIY abstract art piece that will bring vibrance and life to your walls!
I want to start by saying that when you are creating anything - especially art - you have to quiet your inner critic. Let go of all expectations of what your piece should look like and embrace the process. Sometimes you have to let go of your ideas to allow for new ones to emerge. When I was creating this piece, I definitely had a final product in mind that I wanted. But when I first started out, it looked nothing like what I was imagining. Instead of getting frustrated, I told myself to just allow the process to happen and see what new beauty may emerge by my creating. So, just an encouragement to no just imitate what I am showing you here, but open yourself to what you can create!
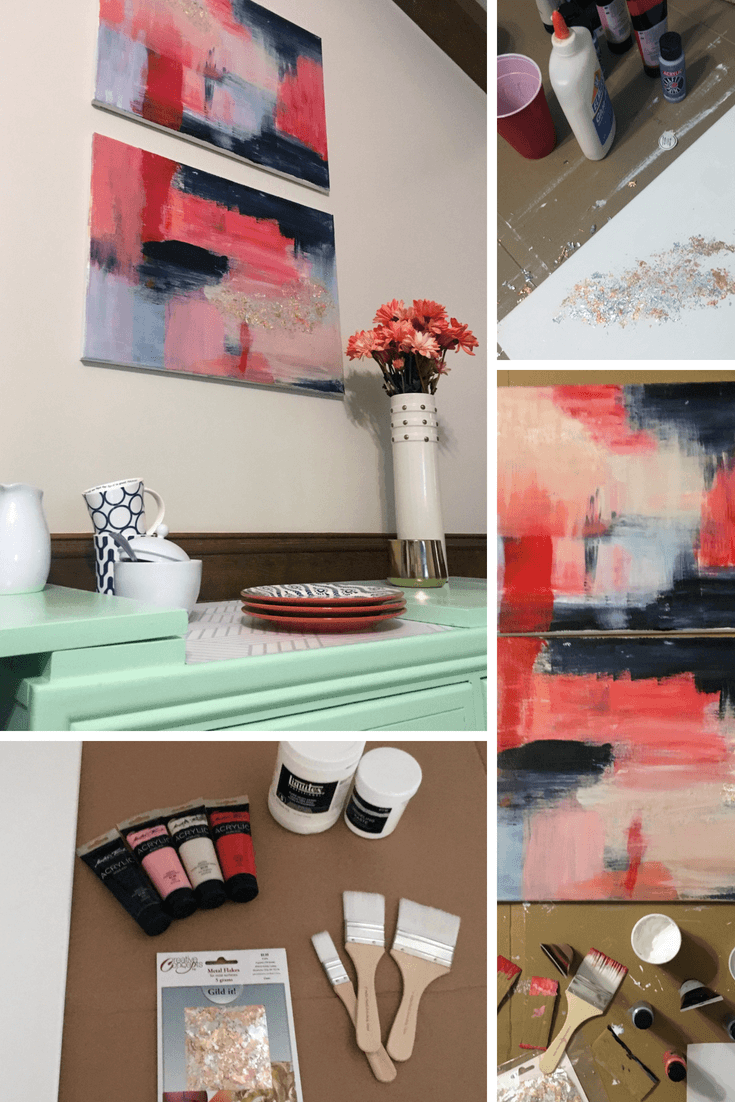
DIY Abstract Art Supplies:

Cardboard or Butcher Paper
Canvas (in your preferred size)
Acrylic Gesso
Modeling Paste
Acrylic Paints
Paint Brushes
Metal Flakes
Elmer's Glue
Palette Paper or Sketch Pad (optional)
DIY Abstract Art Setup:
Cover the surface you are working on in either butcher paper or cardboard. I am a very messy painter and this is a very messy project...so you'll want to protect the surfaces you are working on or around.
Paint Acrylic Gesso over your canvas. This helps to minimize the textured weave of the canvas.
You can optionally add modeling paste at this point. I added some on top of and mixed with my gesso to create a thick, textured base. I also used the modeling paste with my acrylic paints to add texture later on as well.
Allow your canvas to dry for 24 hours.
While your canvas is drying, take some time on a separate sketch pad to play with your colors. I recommend using palette paper so the colors don't bleed through and you'll see exactly how the colors mix together. You can even create a mini layout or guide on a smaller piece of paper to help you decide what your final look will be.


DIY Abstract Art Tutorial:
Apply a thin layer of Elmer's glue in the areas you want your metal leaf to show. (I immediately dropped my paintbrush in a cup of warm soapy water to keep the glue from hardening on the bristles.) Using your fingers, apply the metal flakes in a thin layer over the glue. Brush off any loose flakes. (You'll be adding another layer later so don't worry if it isn't perfect!)
Apply your acrylic paint. I squeezed a small amount of each color onto scrap pieces of cardboard and worked it onto the canvas in both directions. You can do one color at a time or mix two-three colors on the same piece of cardboard scrap to blend the colors on your canvas.
You are going to be doing several layers so don't worry if you mess up or something doesn't look right. You can always go back and layer color over it.
Some of the colors I mixed with modeling paste to lighten it as well as add texture in areas.
I started with a neutral cream/white around my metal flakes and worked outward.Let each layer dry before applying the next. I did three layers of paint before I was satisfied.
When you are done painting, apply another layer of Elmer's glue to your metal flakes area. Reapply the metal flakes until you have the desired finish.


DIY Abstract Art Tips:
Its important to do several layers, but blend your colors when they are wet and layer colors when your canvas is dry.
Step back from your work. Look at it from different angles. This will help you see the whole art piece and how it is or isn't flowing together. Take some time to just look at it and see what's working and what's not.
Embrace the messy and random. This is abstract art, it isn't going to be balanced and symmetrical!
Pick light and dark paint colors - I used a bold red with a light pink and coral. This gave me a wide range of options that blend together well. Consider buying colors that will blend well together as well as a white/neutral to lighten colors.

That's it! All-in-all, I think this project took me two days to do because of drying time. And I am beyond thrilled with the result! Come see how the final product looks hanging over my mint buffet in my living room makeover!


Comments